Description
Ceiling with no metal? No Problem.
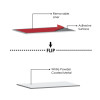
What is a Stick-n-Clik? A rectangular piece of powder coated ferrous metal (white) with 3M VHB PERMANENT adhesive on the other side. Designed to stick to smooth and painted ceilings or window frames, to create locations for hanging displays with ClikMagnets.
Each piece: 19mm/.75” x 57mm/2.25”
Where to use a Stick-n-Clik? The adhesive will stick to most smooth, clean, painted surfaces including metal and plastic.
Weight: .20kg/.44lbs
? BONUS: Free – For ease of installation, each bag of 20 Stick-n-Clik includes one Single MagMover and one ClikMagnet Mini.
- Stick-n-Cliks are designed for ceilings with no ferrous metal or for aluminum window frames.
- Stick-n-Clik can be positioned to the ceiling with the Clik-Clik tools- while keeping your feet on the floor.
- The Stick-n-Clik increases the number of location with ferrous metal (for SAFE and EASY installations using the ClikMagnets and Clik-Clik tools).
- The flat surface of the Single MagMover can be used to firmly PRESS the adhesive to the smooth clean painted surface...while standing on the floor.
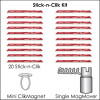
What comes in a Stick-n-Clik Kit?
- 20 Stick-n-Clik
- Single MagMover
- Mini ClikMagnet
Additional Items Required: Line and MagPole
How to install a Stick-n-Clik to your ceiling?
Preparation of material
- Thread a Single MagMover onto the end of a MagPole or an extension pole.
- Attach a long length of line to the Mini ClikMagnet.
- Place the Mini ClikMagnet onto the Single MagMover.
- Remove the Stick-n-Clik's adhesive liner and "Clik" the white side of the Stick-n-Clik to the Mini ClikMagnet
Installation - push, push, push
- Extending the MagPole, lift the Stick-n-Clik to the desired clean and smooth location.
- Push firmly and hold.
- Lower the MagPole, leaving the Mini ClikMagnet on the Stick-n-Clik.
- Move to the left of the Mini ClikMagnet and press the MagMover's head into the Stick-n-Clik.
- Repeat on the right side of the Mini ClikMagnet.
- Insert the MagMover's corkscrew into the Mini ClikMagnet's ring and pull down to retrieve the Mini ClikMagnet.
Note: Wait 72 hours for the adhesive to cure.


